Tag Archives: maintenance

Motorcycle boutiques

I almost forgot about this.

In an earlier post I proclaimed how great it was that H-D dealerships would take a long-distance rider in and do things like oil and tire changes without appointments. And yes, it still is a great accomplishment for most dealerships.

Well, subsequent to the oil change that I received at that dealership in Winchester, Virginia, I happened to have run another 5,000 miles, thus a requirement to change the oil and filter back in August. Lo and behold, the dumbass responsible for doing that oil and filter swap in Winchester managed to completely screw it up.

No, there was plenty of oil in the bag. I checked that out in their parking lot before I pulled out.

Lets make a list.

  • After removing the magnetic plug on the oil pan to drain the engine oil, the maintenance tech proceeds to wrap Teflon tape around the threads and re-insert.

The stupidity in this is that there’s an o-ring on the plug to prevent leaks, thus negating the need for any kind of sealant on the threads. Additionally, Teflon tape isn’t a friend of oil, and it will dissolve due to the heat and composition, thereby causing possible blockage of an oil passage. There are proper compounds available to seal such plugs, but obviously the individual wasn’t aware of them, and whether they were needed or not.

  • When installing the new oil filter, the filter was torqued on so tight that on removal, the filter was attached to the adapter plug and it came off with the filter. Red Loctite is used from the factory to hold the filter adapter in place, so you can imagine the torque that the tech used to hold the oil filter in place.

I had to use a power bar to remove the oil filter, and as noted, the adapter nut came off with the oil filter. Now, attaching an oil filter is not rocket science. Whether it be car or motorcycle, you screw the new filter on hand tight, then apply a quarter-turn past that. Can someone show me where it says to torque down an oil filter so hard that you need two men and a boy to get it off?

Nope, didn’t think so.

So, while happy with the Winchester dealership’s ability to get me in and out quickly for a basic oil and filter change, I must take exception to the competence – or lack thereof – of their service department’s capabilities. Obviously, competent professional motorcycle technicians aren’t something Winchester H-D is capable of employing.

I thought of sending an email or making a phone call, but do I really care if they screw up their local customers’ motorcycles in their shop? They’re a boutique, after all, and what should one expect from a boutique other than doo-rags, dog leashes, suspenders and fingerless gloves?

Tired tires

Last fall I replaced my rear Dunlop 402 motorcycle tire on my ’95 bagger because of wear. The bike shop owner where I was getting the work done told me that the Metzler would last at least as long as the D402. A bonus for me was that the Metz was a bit cheaper than the Dunlop 402, so I told him to throw on the Metz.

Well, I should have known better when he also told me that mine was one of very few motorcycles he’d seen with so many miles on it. In fact, I absolutely do know the following:

  • not many riders put any miles on a motorcycle these days, and that is especially true of American-made motorcycles;
  • many riders don’t maintain their tires at the correct pressure, thus negating their self-inflated (if you’ll pardon the pun) tire mileage statements;
  • consequently, anything most riders tell you about motorcycle tires and their experience with said tires is bullshit, and not worth the time spent listening.

Why I didn’t listen to my own voice of experience, I’ll never know, but I do know this: I rode 5,000 miles less on the Metzler 880 than on my previous Dunlop 402.

Yes, that’s right.

Based on the 15,616 miles I put on my last Dunlop, I got 1/3 less on the Metzler 880 – a measly 10,432 miles.

I’m anticipating another 15,000 trouble-free miles with my new Dunlop 402 rear tire.

Here’s a link to a previous post about motorcycle tires.

Looking for a Metzler tire inflation chart? Go here.

Bearings can skate, apparently

On the road, I never stop at any of the H-D boutiques I fly by, unless I need an oil change or a part. I’m an oil-change fanatic in the sense that at every 5,000 miles (8,000 km), the old oil and filter gets dumped, no matter where I am. I use synthetic oil – anything but the H-D brand when I do it myself. After all, the engine in my bagger is air cooled, and the proven high temperature protection against oil breakdown provided by synthetic oil versus dino oil gives my engine all the heat protection that it needs.

Volumes have been written about the differences between synthetic versus dino oil. Early on in the motorcycle synthetic oil debate, mechanics would declare synthetic oil to be “too slippery” for the H-D evo and twinkie engines and their bearings, and thus “bearing skate” would occur. That statement was, and still is, a complete crock of shit, of course. Synthetic oil works just fine, and in fact, H-D now sells its own brand of synthetic oil which comes installed from the factory in many of their newest engines. How times change.

I must give the H-D dealerships their due. In most instances, their service departments will take a traveler just riding through and give him priority for things like tire changes in the event of a flat, or an oil and a filter change. My last flat tire was down south in New Mexico a couple of years ago. I got priority then in Santa Fe.

I was in and out of Winchester’s H-D boutique dealership in an hour, which gave me time for a sandwich in their deli. Not bad, since the deli was completely unexpected.

To make it all easy, I use H-D’s atlas for an annual up to date listing of dealers in all of the western hemisphere. Handy as hell.

My only wish is that indy’s would provide some kind of a listing of their locations, but of course that’s an impossibility. I would prefer to use and support an indy and his business if I could.

Switched fuse block install

To read about my installation, go here.

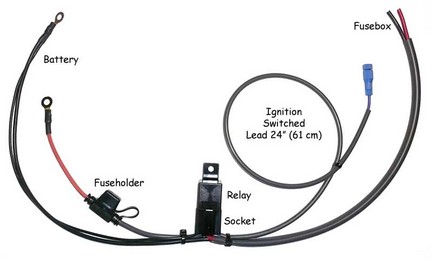
The switched harness from easternbeaver.com

I should have done this years ago, but I only just recently discovered Jim’s easternbeaver.com wiring harness site. The quality of his work is amazing. Had I the ability I couldn’t have built a harness of this quality – and all for approximately U$37.00 which includes shipping.

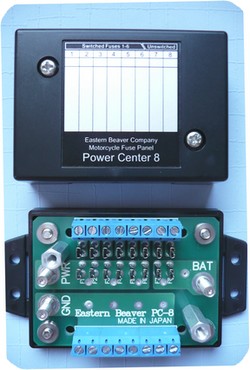
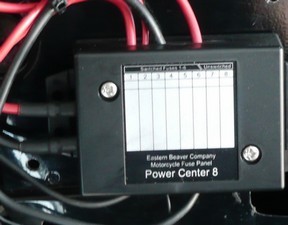
Here’s the finished easternbeaver Power Center 8 fuse block product that fits under the left side cover. Centech also makes a nice little fuse block. easternbeaver’s wiring harness is, of course, unseen, but it appears in the illustration at the top of this page.

The installed fuse block

easternbeaver's Power Center 8 fuse block

Keeping electrical gremlins at bay

Please note: If you’re reading this on any site other than blog.twolaneroads.com, the content has been scraped and stolen in its entirety, without appropriate attribution.

Over the years I’ve added a few electrical accessories to my ride. I dumped the terrible stock horn for an air horn that fits inside the stock horn cover. I’ve added gps and heated jacket relays. There’s a Powerlet outlet for my cheap and very portable air pump for tires. A digital voltmeter is the crowning touch for a check on the highly inaccurate stock meter.

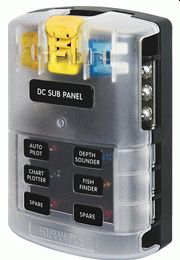
Blue Sea Systems marine-grade fuse blockAfter all that, I’ve decided that I need a switched fuse block harness from easternbeaver.com to make sense of the wiring nightmare I’ve created. The fuse block harness comes with a relay and socket that allows it to be powered on and off with the ignition switch when wired into the bike’s electrical system.

I already have a marine-grade ST blade fuse block from Blue Sea Systems that I’ll hook into the electrical system using the harness. Centech also makes a nice little fuse block.

More to come when the harness arrives and I install it.

xmradio install tip

xmradioI’ve been an xmradio fan for ages now. As an early adopter I was saddled with one of their old Sony units with it’s tiny display and measly five presets. It was long in the tooth and I wanted an upgrade.

I talked myself into a RoadyXT to while away the hours when I’m on the road. The RoadyXT comes with both a home and vehicle kit. Stock in the box is a vehicle adapter called “SureConnect”, which attaches to the base of a non-retractable fender or roof antenna. I tried this interface, but I didn’t like it, so I picked up an FM Direct Adapter, SM10112, which integrates the unit into the existing radio. It’s really a nice, compact little adapter.

Installing it required removal of the radio to get at the antenna lead, which wasn’t a big deal, since the compact SM10112 fits nicely behind the radio upon re-installation. An added bonus: the sound improved too.

Here’s the kicker: No matter which vehicle installation method you choose, remember to power up the XM unit in the vehicle and select “Menu” and then “Frequency” from the menu choice. This will allow you to choose an unused FM frequency to send the signal to your vehicle’s FM radio. The “Frequency” menu selection does not appear when you attempt to select it from your home setup.

I scratched my head over that for a while before I actually went out and installed the unit.

Ragtops

Update #2: Look for Under Armour skull caps and pick a silk cap. You might end up with an elastic ring around your head, so I can’t vouch for the look.

Update #1: I searched around and found some welding caps that I wear under my helmet. They’re made of cotton, cost about the same, and you can buy them anywhere. I turn the peak around and it shades the back of my neck. Added bonus: the welding cap seams are sewn flat, and thus don’t feel like they’re cutting into my head after a couple of hours of wearing one under the helmet.

If you do much long distance riding, the thick seams on the front of the silk or cotton helmet liner will dig into your bald head like a knife after a couple of hundred miles. Unlike welding caps, the silk or cotton liners sold by online motorcycle stores  aren’t stitched with flat seams, thus making such seams too thick to be comfortable over the long haul riding, which is what I do a lot of. On the other hand, if you’re doing short rides around town, you won’t notice a thing.

A baseball stitch would be a great addition to any silk helmet liner. Unfortunately, probably because of cost, you’re not going to see any flat stitching in a helmet liner.

* * *

Helmets are a great invention. The keep your head warm when it’s cold, dry when it’s raining, and sweaty when it’s hot. Thus was invented the silk helmet liner, an accoutrement that makes a rider look like a dork when he puts it on, but quickly turns from a fashion nightmare into an item that makes for a more comfortable helmet. Added bonus: the helmet doesn’t stink up as fast.

If you’re going to get a helmet liner, buy two. That way, you can switch them out on a ride and one dries in the wind while you wear the other. I prefer welding caps, since the seams are sewn flat and won’t cut into your head after a couple of hours.

Helmet sanitation tip

Now that I’m finished with my rant, here’s a tip on helmet sanitation for those of you that don’t have a removable liner: When the old brain-bucket does begin to get ripe–and it will–put it in the dishwasher, without soap, and run it through a wash cycle. Just remember to take the helmet out before the heat cycle comes on. Let it air dry, and voila! Good as new.